Sunday, 23 March 2014

Gluten free dairy free cake


It was my lovely friend Charlie's birthday this week, and I made a cake for her. As usual. However, a twist... Her dad can't eat gluten or dairy. Ah. Take my tools away from me and you get...


I was happy with the design, but the flavour and texture wasn't as good as a traditional sponge. I used this recipe ( http://www.icedgembakes.co.uk/gluten-free-and-dairy-free-baking-recipes/victoria-sponge-filled-with-jam-and-buttercream/) scaled up for a 10" round cake filled with cherry jam and almond "butter" icing and made the icing and the cake with Pure Soya dairy free marg.

I would definitely try to to do this recipe again, but maybe play with flours and stuff to try to get a better (less solid!) texture. Also I promise I will blog more now due to my new toy (iPad, I just like to get on the bandwagon about 2 years later than everyone else!)

JB x

Wednesday, 5 March 2014

Birthday cake!

Here it is! Retro in all it's 70's beige loveliness! But bloody yummy :)


If you hadn't noticed, Mr B had a birthday. And in time honoured fashion, being married to a baker who loves to experiment with all kinds of cake, chose the same one he does every year. Coconut and vanilla. Ah well. It is a good'un. It's a slightly mongrelised recipe I have concocted over a few years, mainly inspired by the wonderous Nigella, but it produces a towering sugary sweet nutty wonder. I iced it with buttercream and piped with plain chocolate, but I think ganache would work beautifully as a filling / topping too.

Serves 10-12 (it is huge).

Grease and line 3 x 20cm / 8" sandwich tins (or 2 sandwich tins and a spare tin as I do!). Oven 170 fan.
Ingredients:
300g butter, softened
300g golden caster sugar
2 tsp actual vanilla extract with seeds and all
100g dessicated unsweetened coconut soaked in 225ml boiling water for about 10 mins
6 eggs
300g plain flour
3 tsp baking powder
2 tbsp cornflour

Method:
Cream butter and sugar together until it's really light and fluffy, then add the eggs until they're mixed in. It'll curdle. I don't care.

Mix in the vanilla, then dump the rest of the ingredients in together and beat it a bit until it's kind of smooth. It might still look curdly. I still don't care. Neither should you, trust me. By the way you add all the soaking water from the coconut too.

Divide it between the tins (not that I'm anal but I weigh it, about 500g each. Just over actually) and bake for 25 mins.

Then, to fill and ice, I made a whopping batch of vanilla buttercream (180g soft butter,  600g ish icing sugar, 50ml milk, 2 tsp vanilla schtuff with seeds, blitz like heck in a stand mixer with a cover on until light and dreamylicious) and spread over, under and around the cake. I then toasted some extra coconut and stuck it up the sides. With added glitter, obvs. It's a birthday cake. It needs glitter.

I'm sorry to your arteries. But your soul will thank me.

JB x

Chocolate and Salted Caramel Bundt

Apologies, for many things. Firstly, may blogging laziness, and secondly the quality of this photo. Honestly, I forgot to take a pic until the cake was almost gone (which wasn't long!)
Here it is: my little invention...


It honestly does look better in one piece!

I love my Bundt tin, and I decided it should house a combo of salted caramel and chocolate cake. Who wouldn't want to?! Plus I made a caramel to drizzle all over the top in it's grainy, sludgy saltiness. Yum yum indeed. Serves 10.

Ingredients:
Group one...
350g plain flour
200g golden caster sugar
100g dark brown soft sugar (or muscovado, just something fudgy and dark)
2 tsp baking powder
1/2 tsp bicarb
1/2 tsp salt

Group two...
3 eggs, lightly beaten
150ml cream, sour cream, greek yogurt or other dairy style wetness
125ml sunflower oil
170g melted salted butter
300g chilled water

Extras...
2 tbsp plain flour
1 tsp vanilla extract

2 heaped tbsp cocoa powder

Caramel topping...
100g butter (salted)
100g dark brown sugar
good slosh double cream
sprinkling maldon sea salt or other nice big flakes of salt

Method:
Preheat your oven to 170 (fan) and butter your big Bundt tin (approx 28cm diameter). SMaller ones will suffice.

Add group one of ingredients into a bowl and whisk together until any lumps of sugar are broken up.
Whisk group two together until well combined, then beat into group one until a smooth batter is formed. Then, divide the mix into two, and add the cocoa to one half and flour and vanilla to the other. You will then have one beautifully dark and mysterious bowl of batter, and one lightly tanned one, like it's been on holiday. Yum in itself.

Pour the two in whichever way you fancy into the tin and marble them together (slightly) with a teaspoon or any other favourite kitchen implement. I like to have a gently marbled cake, but you could mix it more thoroughly if you like. Then, bake it for 55 minutes or so until your skewer comes out clean. Leave it to cool in the tin for about 10-15 minutes, then turn it out.

To make the caramel topping, melt the butter and sugar together until the sugar has dissolved, then bubble gently for about 30 seconds to a minute. Add the cream (careful, it will bubble!), a pinch of salt, then set aside after stirring well until it's slightly thickened and a little cooler. hen, pour gently over the cake and sprinkle salt over to taste.

Bloody lovely.

JB x

Sunday, 16 February 2014

steamed pork buns


These are a revelation! Leftover meat need never be dull again!

I go this recipe basically from Jamie Oliver's money saving meals. It's a lovely way to feed a crowd with a very easy but complicated looking, yummy load of little hot, yummy buns of loveliness. And ready in 30 mins!

Makes 8 buns (serves 2-3 hungry peeps)
Ingredients:
250g self raising flour (or plain with a couple of level teaspoons baking powder)
200ml milk (or water at a pinch)
1/2 tsp salt

150-200g leftover roast meat (I used pork but chicken would work, or even prawns, ham etc would probably work. Or stir fried veggies even. Or tofu?!)

Big squidge tommy K mixed with 1/2 tsp chinese 5 spice and a good dash of dark soy sauce OR bbq sauce mixed with spice.

Method:
First, chop your cooked meat / filling stuff, and mix with the sauce.
Then, mix the flour with the salt and milk. give it a good mix so there are no lumps; it will possibly be a bit sticky, so sprinkle it with a little more flour in order to handle it. Split it into 8 equal pieces.

Flatten each piece into a round patty about the size of the palm of your hand (or maybe smaller, I have unusually small hands for a lanky person), fill with a decent teaspoon of mixture, and squidge the dough all around it so the meat is fully encased. Repeat until you have 8 little balls with a surprise inside!

Place said balls into non stick paper bun cases, and arrange them in a bamboo steamer basket or a metal steamer over an inch of boiling water (or a posh standalone steamer!), and steam for 15 minutes. They will puff up and be gloriously light and chewy. Sprinkle with sesame seeds and serve with any kind of dipping sauce and a mountain of stir fry veg. Yummers!!

Pink Pie!

Made a version of key lime pie yesterday. Without the limes but with raspberry and white chocolate... So Pink Pie was born! It's a kind of baked mousse non cheesy cheesecake thing and really rather yum.

Ingredients:
Base - 160g gingernuts and 160g digestives, smashed up in a bag (or blitzed in a processor if you have one) plus 100g melted butter
Topping - 4 eggs, separated, one tin (400g ish) condensed milk, 200g raspberries (half pureed, half whole), 100g chopped white chocolate, 50g caster sugar, 1/2 tsp cream of tartar

Method:
Mix the biscuit crumbs into the butter and press firmly into the base of a 9" springform tin. Fridge it until set. Preheat a (fan) oven to 160.

Meanwhile, mix the egg yolks, condensed milk and raspberry puree until just combined. Separately whisk the egg whites with the sugar and cream of tartar until stiff and meringue-like.

Then, scatter the chopped chocolate and whole raspberries over the base. sacrifice 1/3 of the egg whites and beat well into the yolky mixture. Then gently fold the rest of the whites into the pink yolky stuff until just combined.

Pour over the base, and bake for 25 mins until just a faint wobbliness remains in the centre. Leave until pretty cool, then extricate from the tin (carefully!) and fridge it until you serve. Decorate with white chocolate ganache, chocolate curls or fresh raspberries (or even better all of the above!!).

Saturday, 18 January 2014

Pan de yuca! Ecuador!

I have had that incredible song by SASH! in my head all morning... ECUADOR!!! I'm pretty sure that song is from (cough) 17 years ago when I had by 13th birthday while in France on an activity holiday. I remember ringing my parents from a payphone (remember them?!) on the campsite reporting that I was having the time of my life and definitely was not homesick at all (the first part was true, the second a slight lie) with this playing in the background.

Right, back to floury things. I couldn't find pure tapoica / cassava flour. But I did find Dove's farm bread flour gluten free substitute type thingy, made with potato and tapioca flour. So I gave these little balls a try...

Ingredients:
1/2 cup grated cheese (I used cheddar. Pretty sure this is horrifically unauthentic.)
1/3 cup olive oil
2/3 cup milk
1 1/2 cups said flour
1/2 tsp salt.

Method: Stir together, then give a good blitz with a stick blender (or chuck all in a food processor if you like). Apparently at this stage it can be refrigerated for a couple of days.

I then sprayed a mini muffin tin with olive oil, then put a fat teaspoon of batter into each hole and baked at 220 degrees C for 15 minutes, and...


Little cheesy chewy balls of yum. I have no idea how the Ecuadorians eat these (although I found a lovely piece about these with frozen yogurt which I think could be ace) but being clueless and British I went for a salad. Then realised I had no balsamic vinegar. Naked salad is definitely not the most inspiring side, sorry Ecuador! But lovely cheesy balls :)


JB x

Pistachio and lemon streusel cake

Cake cake cake. I wanted to make a different cake and chose to do a combination of a couple of favourite flavours / techniques to create this bad boy:

Pistachio and lemon are good friends. Something about the buttery freshness of pistachio seems to get on well with lemon. Other nice combos could be maple and pecan, apple and oatmeal with ginger, coconut and lime, or if you're feeling decadent macadamia and vanilla?

Streusel cake is a cake made with a crunchy topping (and in some cases filling) made of something resembling crumble topping, or breadcrumb based if you're of a more traditional mindset. This gives a nice bit of textural contrast to a soft cake, and they're traditionally baked in a ring tin. I see no reason why this recipe couldn't be quite happy in a different shaped tin though :)

The base of this recipe is a Hummingbird bakery version, but I've (as usual) changed things about a bit... below is what I did. The streusel is layered through the cake batter, then a lemon syrup is poured over after baking, then finally a glacé icing is added with nuts (and I put crystallised lemon peel) for final prettification.

Streusel:
80g plain flour
50g marg or softened butter
50g demerera sugar
zest of 1 lemon
85g chopped pistachios

Rub butter into flour and sugar, then stir in the nuts and zest. Set aside. It should look kind of like this...
Cake:
170g softened butter or margarine
250g caster sugar
3 large eggs
1 tsp vanilla extract
300ml soured cream
420g plain flour
2 tsp baking powder
1/2 tsp bicarb
Pinch salt

Butter and flour a big (25-28cm diameter) ring tin (non stick is definitely best). Comme ça...
Cream butter and sugar until light and fluffy, then beat in one egg at a time (use an electric mixer of sorts or prepare for a very sore arm...). Then stir in the sour cream and vanilla until all mixed completely together. Sift the flour, baking powder and bicarb into the wet ingredients, then stir in the salt and give it a good beat until all combined. Now layer streusel and cake mix... Half of the streusel goes into the tin first (to form the crunchy topping), then half the cake batter, then rest of streusel, then rest of batter...
  Streusel, then cake... then streusel...
 then ready to bake! 


Bake at 170 degrees C (fan) for 1 hour until a skewer comes out clean.

Syrup:
juice of 1 lemon made up to 50ml with water, boiled up with 50g sugar for a minute until all dissolved. Once cake is out of the oven, pop lots of skewer holes in and pour syrup gently in, then leave the cake to cool in the tin.


Then turn it out...
Then ice with the juice of a lemon made up to icing consistency with icing sugar and sprinkle with pretty stuff. Yummy!!!


JB x


Sunday, 12 January 2014

This week I am on the search for... Cassava flour

It's been a little while, but I'm now back on the journey around the world!
Next up is Ecuador. I've heard from a colleague about some cheese bread in Brazil which is amazing, but Ecuador seems to have its own variant (pan de yuca) which I'm very keen to make this week. Just gotta find some cassava flour!
JB x

Wednesday, 1 January 2014

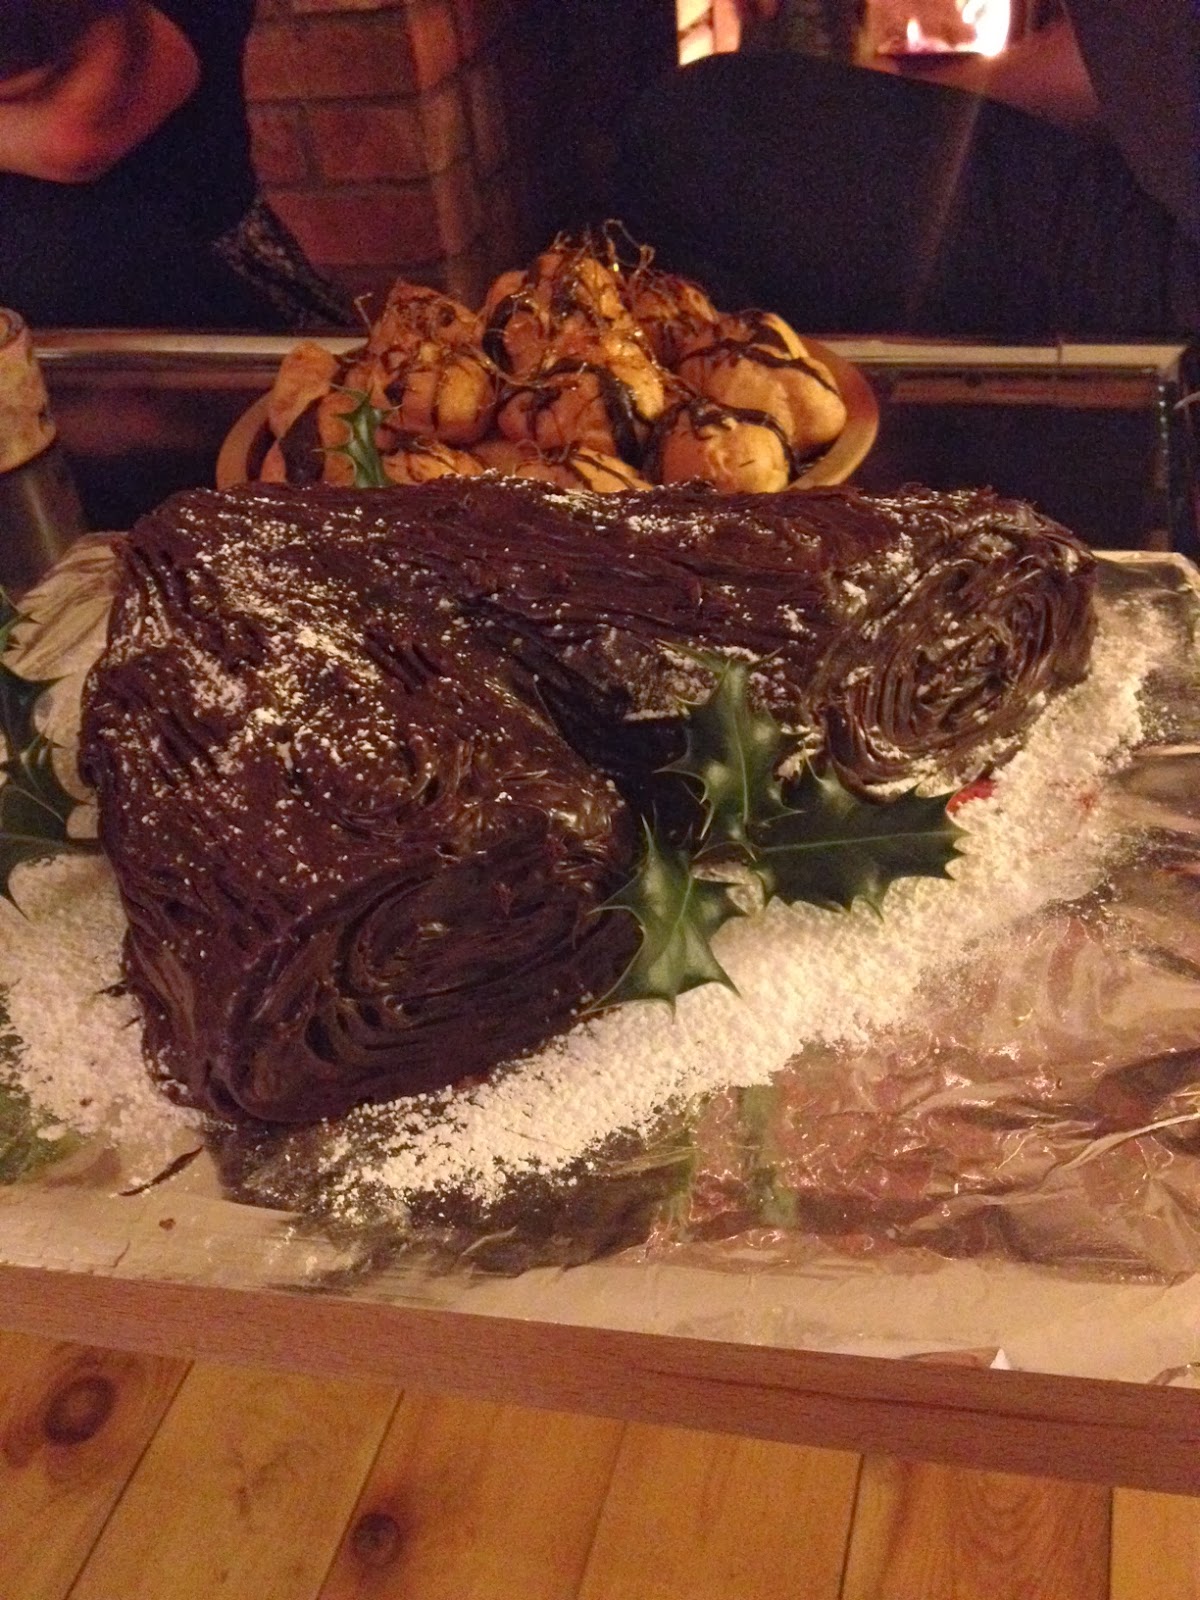
Buche de Noel (Chocolate log!)

Well. Mr B was probably the most impressed by this cake than any other I've made. It takes about half an hour if you're quick, no more than an hour if you're a little slower around your kitchen.

This is a Christmas chocolate fest with many different adaptations: chestnuts are often referred to in recipes, as is chocolate buttercream. I chose to make the chocolate sponge roll filled with whipped cream and fresh raspberries (frozen would also be ace in this) and cover it with ganache. Below is a list of my recipe, and alternatives if you would so wish!


This size fed 10 people along with the giant profiteroles, but I have no doubt smaller numbers would see no problem in dealing with this cake...!

Sponge:
40g cocoa powder
65g Self raising flour
100g caster sugar
4 large eggs

Filling:
I used 300ml double cream, whipped, with a handful of raspberries scattered in
You could also use whipped cream with chestnut puree folded in, chantilly cream, or buttercream of any variety, and add anything you like (cherries, rum soaked raisins or orange zest spring to mind)

Icing:
300g dark chocolate ((NOT fancy chocolate - standard plain chocolate with a cocoa content of 45 - 50%)
300ml double cream (well it is Christmas!)

Method:
This is alarmingly simple.
Preheat the oven to 200 C. Line a swiss roll tin (30 x 20 cm or a little bigger) with non stick paper.

Plonk your eggs and sugar into a mixer and whisk until really pale, light and leaves a trail when you lift the whisk out (this will take a few minutes). Then fold in the sifted flour and cocoa very gently so you don't knock the air out - don't worry if there's the odd lump. I won't tell if you don't.

Pour and gentle spread the mixture into the tin - if it's a little bit of a struggle to get it even then err on the side of uneven as opposed to knocking the air out of your mix. Bake for 8 - 10 minutes until risen and springy. When it's out of the oven, take the cake out still attached to the paper and roll it lengthways while still hot-ish into a sausage, then leave to cool still coiled up on it's paper like an odd christmas cracker.

Meanwhile, make the ganache - Break up or chop the chocolate into smallish bits, then heat the cream into a pan until it's slightly ouchy to keep your finger in it for longer than a few seconds (technical, I know). Remove the cream from the heat and plonk in the chocolate and stir until smooth, glossy and delicious in every way. Set aside somewhere cool-ish to thicken.

By now your cake should be pretty cool - whip the cream, then gently unroll the cake and peel it away from the paper. spread the cream and splodge a few raspberries into it, then re-roll (don't worry if it looks messy, it'll still look ace later!) and put onto a serving plate on it's seam so it stays rolled.

You can at this point do some lumberjack work if you like: I cut a piece off my log at an angle and put it next to the bigger piece to look like a branch, or you can leave your log just as it is. Up to you!

Then, when the ganache is a bit thickened but still reasonably workable, spread a layer using half to 2/3 over all sides of your log. As you work it will thicken, so once you've got a layer covering everywhere, the last 1/3 or so of the ganache will be nice and thick, so blob it on and use a fork to create bark. Use your creative licence (and maybe google images!) to create a neat or messy log, complete with icing sugar snow if you like. 70's holly optional.

Keep in the fridge until you eat it - I wouldn't make this in advance as the fatless sponge may dry a bit, but I've never resisted one long enough to find out :)


JB x

Game pie

Last night (see previous post!) we welcomed in the new year with pie. Not just any pie, a behemoth of a game meat pie served with honey mustard roast carrots and pickled red cabbage. Winter on a plate! (Convenient as I sit here typing in a reindeer jumper in 14 degrees C IN MY LIVING ROOM. Freeeeeezing! We're also too tight to actually put out heating on much though so probs my own fault)

Anyway. I didn't take a picture cos I was too excited, and also the leftovers today aren;t the most photogenic thing in the world. Trust me though, this one's deeee-lish. I made the recipe up: feel free to substitute whatever meat you would like. However, I would stipulate you need some type of fatty cured meat (bacon, sausage meat) mixed in or it will be a little dry and bland. This makes a hand raised pie similar to a pork pie in construction and application (eat at room temperature, pretty solid, ruddy amazing with chutneys and picks but also just as home on your dinner plate). It made enough to fill my 2 lb loaf tin and would serve 6 normal peeps or 4 hungry ones. Vegetarians look away now.

Filling:

  • 6 rashers streaky bacon
  • 350g venison (casserole type, not fancy steaks, mince would be fine)
  • 2-3 tbsp port, madeira, sherry etc (just one, not all three!)
  • 1 tbsp pokey mustard (english, dijon etc)
  • salt and pepper
  • 6 sage leaves, good sprig of rosemary and thyme
  • 250-300g game of your choice (I used a mix of grouse, rabbit and pheasant) in chunks.
Pastry:
  • 200ml water
  • 70g butter (unsalted)
  • 100g lard
  • 1/2 tsp salt
  • 500g plain flour
Jelly (controversial but in my opinion essential, you can leave it out if you like)
  • 2 leaves gelatine
  • 1/3 pint stock (from a cube is fine, or homemade is also good but will need extra salt)
  • slosh of port / sherry etc as before.
Method:
  1. Make the filling. I don;t have a food processor so used a knife and a board to finely chop the bacon, venison and herbs together, and mixed in the mustard, booze and seasoning. This forms the kind of sausage meaty type of bit of your filling. The chunks of game will be squished into this as you go along to create a pie with a nice rustic meaty texture.
  2. Make the pastry: Traditional hot water crust has only got lard and not butter; feel free to use that combo if you like. I personally think butter improves the pastry flavour and makes it a bit tastier. But it's up to you! Put the water, salt and fat(s) into a pan (bigger than you think you'll need as you need to fit the flour in too) and heat until the fat has melted. Plonk in the flour, and mix until it starts to make a ball. Then, turn it out onto a worktop or board (it'll be a bit hot, be careful!) and knead lightly for a minute or two until a silky ball of wonder has been achieved.
  3. Next, place a piece of baking parchment into your 2lb loaf tin so it fits over the long sides and hangs out over the edge (this forms a handle so you can lift out your pie) and use about 3/4 of your pastry to squidge into the tin, making sure it comes right up the sides and there are no holes. 
  4. Preheat your oven to 200 degrees C. Now squidge about 1/3 of your sausagey filling into the base of your pastry lined tin, then push a few chunks of meat in. repeat until it's full right up to the top, then squidge the last bit of pastry (hopefully it's still warm!) into a rectangle and put it on top, pinching to seal the edges. Make a big steam hole in the top (you can decorate it if you like with shapes form any extra pastry scraps and egg wash if you so desire).
  5. Bake at 200 for 1/2 hour, then 170 for a further 1 to 1 1/2 hours until a meat thermometer reads 80 degrees C (or just an hour and a quarter if you don;t want to faff!). Remove from the oven and let it cool for about 10 minutes, then either jelly, or don't jelly. I recommend you jelly...!
    1. if you don't want to jelly, just pop the pie out of the tin and onto a rack over a tray to catch any juice, then poke a couple of holes in the bottom of the pastry. This lets the meat juices out and as it cools will stop the pastry sogging. Don't be alarmed if you get a lot of juice!
    2. If you do want to jelly, soak the gelatine in cold water for a couple of mins, meanwhile blitzing te stock and booze in the microwave for a minute so it's hot. Then add the gelatine (squeezed of excess water) into the hot stock, and pout carefully (a piping nozzle makes an excellent funnel!) into the steam hole in the pie. Go slowly and you ay not need the whole amount.
    3. Cool before eating - if you add jelly it should really be left overnight before demolishing or you may get juice running out when you cut it.

Soufflé! Happy new year!

It's been a little while (soz, xmas and all that) and the baking has been happening but I've not been a blogging. So here goes with a few little catch ups, most recent first!

Last night Mr B and I stayed in at NY for the first time in about 7 years. It was actually a lovely evening, and I made a big old game pie (delicious, post to come) and passionfruit soufflé for pud.

Here the little blighters are in all their vertiginous glory...

I served them with a little scoop of ice cream and the seeds from the passionfruit spooned over. They were my first foray into soufflé and won't be my last, I loved their lightness after a gurt big old main course. Yum. The recipe is from Allegra McEvedy (I got her book for Chrimbo and it is a great go-to, reminds me a bit of Nigella's How To Eat). It's just 2 eggs, separated: into the yolks whisk 2 tbsp passionfruit juice and 2 tbsp sugar, then whisk the whites up with 1 tbsp sugar til stiff, fold gently together and bake in buttered sugared ramekins for 12 minutes at 160. I was tres excited when they had actually risen! I'm already thinking of different flavours; raspberry or lemon would work well, or maybe bergamot with an earl grey tuile?! Maybe if I'm feeling fancy!!

Today is a fasting day so this is a little painful to look through pics to post... got some Christmas calorie induced expansion to shift!

JB x

Wednesday, 11 December 2013

Choux choux choux!

Well. Choux pastry.

Eclairs, profiteroles, Le crazy croquembouche... All ruddy delicious. And choux based. I saw a pic in the metro this morning about Michel Roux Jr (hero) doing a programme about Patisserie this evening and ever since, choux was on my brain! I hadn't made any in a while, so I wanted to revisit it.

I decided to make a batch for the freezer, so when I next have a houseful to feed I'll fill them with some form of cream/custard/chocolate combo. Deelish!

My favourite recipe is by Delia (love her), and a quick google or old fashioned look in a recipe book will find it. It's a slightly tricky beast but don't be put off... The first time I made it i created small bombs with raw dough inside, but usually (just jinxed it now!) Queen Delia Goddess of All That Is Baked knows best. The mistake I made was (first time) medium instead of large eggs, and I suspect also not beating enough.

I use exactly the ingredients our Del recommends, but my method is a little different...Lazy Jo uses her mixer for this...!

So melt butter and water together, add flour and a spot of sugar in one lump as Delia says. Once I get to the stage where it's a ball and I'm ready to add the beaten egg, I plop it into my mixer and use about speed 4 or so to do the leg (arm, beating pastry with a leg does sound impressive though) work for me as I add the egg. 

Then, pipe, bake, do a small dance of hope, and open the door! It's recipes like this that make me miss my oven with a glass door... Although it does bring a certain feeling of edge of the seat as you open the door :)

Piercing them to let the steam out prevents them from sogging as they cool. 

And here they are, fat little beauties that they are! 

Plenty of cream space :)

Today the pastry gods were on my side! Now, just to work out how to get then to love me all the time... :)

JB x


Calentita! Baking around the world has got to Gibraltar!

This is apparently the Gibraltan national dish. It is an extremely simple recipe, and created a kind of chick pea based slightly wet Yorkshire pudding type thing. 
I ate it for dinner tonight with some avocado, tomato and goats cheese salad... It was certainly nice, but a bit too pasty for my liking; I did cook it for ages and ages (1 1/4 hours) but it kind of seemed to defy physics and remain kind of paste like in the middle!

Anyhow, here's a pic: the mixture is VERY wet but all the recipes I found added the same amount of water!

The flavour was lovely though, I love chick peas and this had that lovely nutty, creamy flavour. Nice!

Ingredients:
250g chick pea flour (often I'm the Asian section of the supermarket)
850 ml water
Salt and pepper
Enough olive oil to cover the base of a 20x30cm ovenproof dish


1. Stir together the flour, water and seasoning. Leave this for a couple of hours (or overnight).
2. Put the oil in the dish and put it in a very hot oven (225 degrees) until the oil is hot.
3. Carefully pour the flour and water into the dish after a good stir
4. Bake for (apparently) an hour at 180 - 200 degrees: I needed at least 1 1/4 hours.

Not a great success as far as I'm concerned! I would love to try some how it's meant to be as I fear I may not have done it justice!

JB x

Saturday, 30 November 2013

Snowflake Christmas cake

Today, I finished decorating this year's Christmas cake. It's made to my Mum's excellent fruitcake recipe, which has converted even the most reluctant fruitcake eater into a fan.

A really nice way to decorate cakes is with a simple design, with an emphasis on textures and a nice, clean finish. This method works really well on celebration cakes and wedding cakes, and I chose snowflakes for this year's Christmas effort.

The pearl effect on the snowflakes is the brilliant Mich Turner Pearl Lustre, a magical produce which is now unavailable. And this makes me sad. Please Silver Spoon, bring it back!!! It came in three colours and I only have pearl left, and it's a gorgeous thick but flowable paint which dries to a beautiful gentle lustre.

This technique works best with playing with different sizes of cutter, and is a really impressive but simple way to make a cake look lovely :)


JB x

Super simple sinful chocolate fudge :)

This is one of the best recipes I know. Chocolate fudgey goodness, infinitely easy, infinitely versatile, quick, impressive, delicious, calorific. All excellent qualities, I think you'll agree.

So I originally found the recipe in Nigella Express in the guise of chocolate and pistachio fudge, but I've tweaked a few things (how unlike me!) and now present to you.... one of the best recipes ever. I regularly make this for christmas pressies, 'thanks for having us for dinner' gifts, birthday gifts, or because there's an 'a' in the month. Or a 'j'...

I'm a bit sad about sharing this as now people will realise I'm not that clever or some sort of Willy Wonka genius (which I guarantee people will think after tasting this). My only advice is that it does get a tad on the squidgy side if it gets warm, and improves immeasurably if eaten straight from the freezer.

Makes quite a lot.

Ingredients:
380g chocolate - I prefer plain but have successfully made it with milk or white
1 tin (350-400g) condensed milk
a small knob of butter
approx 150g 'extras' - nuts, biscuit chunks, marshmallows, dried fruit, choc chunks etc etc etc...

Method:
Melt the chocolate, butter and condensed milk together gently over a low heat in a heavy bottom pan. Stir it all together and it will start to thicken - at this point fold in the extra bits, and plop it into a cling-film lined 20x30cm baking tin. Sprinkle more bits on top if you fancy. Edible glitter is always welcome and to be encouraged. When set, slice into chunks. Congratulate yourself on just how clever you are to melt some things together and create complete magic.

Below is my salted fudge chocolate fudge...


Nom, nom, and indeed nom.

JB x


Monday, 18 November 2013

Baking around the world... Cambodia

This week saw this...

Cambodian coconut pound cake, also known as Num Tirk Doung. It's a dense-ish Madeira type cake made with coconut milk and shredded fresh coconut, along with a lot of vanilla extract! Safe to say, Mr B was a big fan.

Recipe for 1 loaf tin cake (I used a 2lb tin but you could probably for it into one)
Ingredients:
1/2 cup melted butter
4 medium eggs, beaten
1 cup sugar
1/2 cup coconut milk
2 cups plain flour
1 tsp baking powder
2 tbs (yes, I know!) vanilla extract
1/2 cup shredded coconut (I used fresh, I'm sure dessicated unsweetened would work too)

Method:
1. Grease or line the tin, preheat oven to 160 (fan).
2. Mix the melted butter, sugar and eggs together until smooth and goopy.
3. Add the coconut milk and vanilla.
4. Add in the flour and baking powder and mix briefly, then stir through the coconut. 
5. Pour into the tin and bake for approx 1 hour until a skewer comes out clean.

The cake came out like a lovely moist buttery coconutty delight. It also lasted well wrapped in cling film. Me being me, I decided it would also be excellent with some icing (what cake isn't?!)... I'd probably do something with a bit of a bite like a lime glacé icing or a cream cheese frosting. 
Loved this with a cup of tea! 
Next stop... The Philippines x

Wednesday, 6 November 2013

Chocolate cherry cheesecake cake

I made this beast of a pud this week. It's from the Hummingbird Bakery Home Sweet Home book, and boy oh boy is it calorific :)

It's basically an adventure into a Bundt tin involving dense chocolate cake wrapped around a cheesecake core studded with sour dried cherries. Oh, and glazed with cherry jam. Obvs.

I won't repeat the recipe for copyright reasons but the idea of cake wrapped around cheesecake is a winner in my book... I'm thinking future incarnations would be chocolate cake and ginger cheesecake, coconut cake with lime cheesecake, chocolate and raspberry cake with raspberry vanilla cheesecake...

Tin...
Half of the cake mix in...

Piped with cheesecake mix...

Covered with more cake batter...

Finished and glazed :)

JB x

Around the world... Bolivia!

Oooh, this was a weird one but a good'un! Humintas is the recipe, I compiled the recipe below from a few I found online.

This is a savory baked version of a classic South American recipe. It's a corn based cheesy cake... Sounds weird, tasted lush with a salad of tomatoes, peppers, coriander, marinated onion and borlotti beans for a midweek dinner.


Recipe (serves 4 or 6 as a starter/ lunch)
1/2 cup plain flour
1/2 cup fine semolina
1 tsp baking powder
2 big tins (280g each) sweetcorn
1/2 tsp salt
1/4 cup flavourless oil
1/2 cup low fat yogurt
2 eggs
Splash milk
Good grating of mature cheddar
Pinch of chilli powder

Method
1. Line an 8" square baking tin and put the oven on to 180 degrees C.
2. Put the flour, semolina, baking powder and salt in a bowl.
3. Plop the eggs, yogurt, oil, one tin of sweet corn and milk into a jug and blitz with a stick blender for a few seconds until mainly blended.
4. Stir the yellow corn mix into the dry ingredients and the stir in the corn which you didn't blend in.
5. Bake for 20 mins, then sprinkle the cheese and chilli on top and bake for another 10 mins.


Yum :)
JB x


Sunday, 27 October 2013

Baking (cough, 'cooking with flour') all over the world... Somalian anjero

So extensive googling revealed that the Somali kitchen looks like an excellent place to be. There are lots of recipes and blogs packed with amazing looking recipes, from spiced rice and meat dishes to american inspired cookies and cakes.

I decided to try "Anjero", a sourdough pancake often eaten for breakfast with a little butter and sugar. Which, I have to say, was an excellent way to start this morning :)

The recipe is from here and is tres simple: 1/2 cup cornflour, 2 cups self raising flour, approx 2 cups lukewarm water blended together and left for a day or two to ferment in a warm place. They were then cooked in a buttered pan and turned out like lovely, slightly crumpetty tangy pancakes. Lush.

I can imagine these would be really good with savoury foods; sadly the Brits are crap at doing anything imaginative with any form of pancake. 'Lemon and sugar' seems to be as far as they can think. I reckon these would be lovely with something savoury and sloppy, like a good spiced bean stew, or layered with shredded chicken and chillis and cheese and whacked under a grill. You could also add corn, chopped spring onions and chilli to the batter and make a nice savoury corny pancake thing. I'm making myself hungry again now... :)


Baking all over the world gets to... Sweden! Saffranbuller lussekatter

Swedish saffron scented little golden buns, studded with raisins. Yummy! These are apparently a Christmassy treat, the rest of the year is more cinnamon bunny. I'm a complete chelsea bun addict though, so I wanted to try to make something a bit different, as I'm not sure anything in the world could hold a candle to the chelsea bun in the cinnamon bun stakes. Although I've been wrong many times before...

Lussekatter means St Lucia buns. For reasons which escape me the Swedish celebrate St Lucia on 13th December, so these are a treat for then. Saffranbuller means saffron buns. I'm not eveb sure what the proper names for these bad boys are.

So how do they taste? Really good actually, delicately scented with saffron but comfortingly sweet. My hand slipped with the sugar so they ended up probably too sweet for me, but Mr B was a definite fan. The dough is unbelievably silky and wonderous to handle, and the texture of the crumb was probably the softest I've ever managed. Lush with a cup of tea. This recipe makes about 15-20 so I have plenty in the freezer :)


Ingredients
250ml warm milk
12g dried yeast (seems like loads but it actually needs it - all the sugar and butter retards its action)
75g sugar
75g melted butter
big pinch of saffron threads, ground in a pestle and mortar
generous pinch of salt
125g quark (or natural greek yogurt would work I reckon)
approx 3-4 cups strong white bread flour
Some raisins
Egg for egg wash

Method
1. Plop the yeast and sugar into the milk, then whisk in the melted butter. Stir in the saffron.
2. Put the wet ingredients into the bowl of a mixer, then add the quark and a cup or two of the flour. Use the dough hook to mix together and gradually add enough flour to make a soft dough - don't add too much as it will make it too tight, but too little and you'll get a paste. Which nobody wants.
3. Knead it in the mixer for 10 minutes. I know, it seems like ages. But all the recipes I found agreed on this one. If you don't have a mixer, just combine the ingredients with a spoon and knead for (sorry...) 15 minutes.
4. You should get a gently golden, beautifully silky dough. Leave it, covered, to prove for approx an hour or so until doubled in size.
 5. Knock the dough back and knead it gently. Divide the dough into about 20 equal portions (mine were about 50g each). Roll each into a sausage about 25cm long, then curl each end around to make a big 'S' shape and stud with a raisin...
6. Place them, well spaced, onto a baking tray (greased or covered with baking paper) and cover again to prove for another 30 mins or so. I use big polythene bags (pedal bin liners) as I can just put the whole tray in and tuck the edges under instead of trying to cover it with cling film or unpeel any stuck dishcloths...
7. Brush with egg (not essential but I forgot and my raisins fell off!) Bake at a very high temp (220 degrees fan oven) for 8 mins. Be careful as the enriched dough will catch really quickly and you'll end up with a bitter bun. Sad times.
8. Devour... :)